|
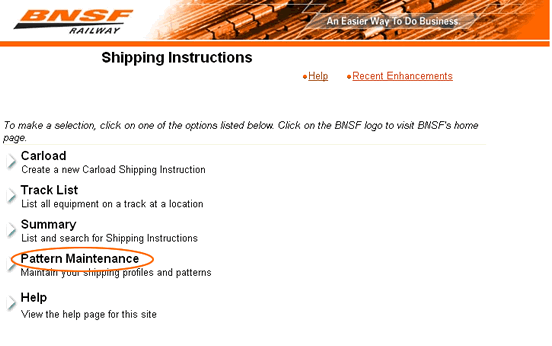
BNSF's shipping instructions package allows you to create and transmit bills of lading to BNSF with minimal data entry. Your company's repetitive waybill data and equipment inventory are stored on BNSF's server. All you have to do is select from the options presented on the shipping instructions screen. Once you have transmitted your shipping instruction to BNSF, just point and click to view the status of your document at BNSF. New Shipping InstructionDepending on the commodity you ship, you will see one or more of the following links on the Shipping Instructions Main Menu: Carload, Intermodal, Grain, Carload Haz, Intermodal Haz or Grain Haz.
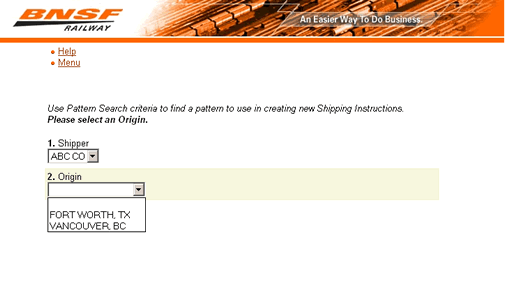
On the next screen, if you are set up for more than one shipper,
you will select a Shipper from the first drop-down. If you only have one shipper that you bill for, it will already be selected for you, and the next drop-down will be highlighted. From here you will select an origin and/or
destination.
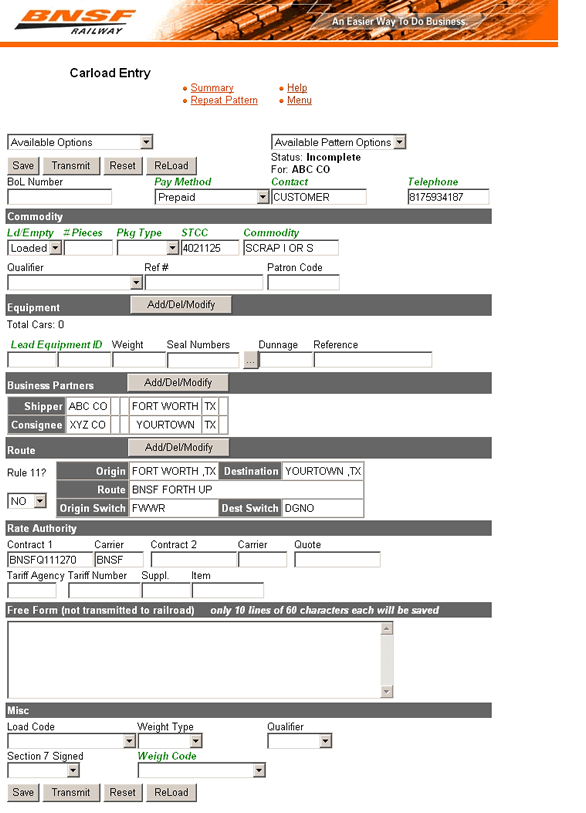
Shipping Instructions EntryOnce you specify where you want to bill your cars to, the Entry screen with your pattern information will be displayed. On this page you will need to supply the unit initial, number and weight (if applicable). There are also additional fields available for optional information (i.e. BOL #, ref. #, and free form fields). As a rule, any fields that are highlighted in green will be required - the weight field is an exception depending on if you supply the weight, if BNSF does or if it is an empty car.
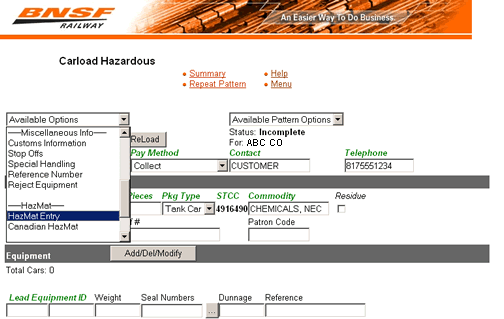
If you were set up with automatic bill of lading number generation by BNSF, your bill of lading numbers will be generated for you. If you would like to change the number, simply delete the existing number and key in the new number. If you no longer want automatic generation please contact BNSF at 888-428-2673 option 4, option 1, or send an email to eBizHelp@bnsf.com. Available Pattern OptionsIf you are creating a shipping instruction for a new movement, you may modify the pattern data. You do not have to save this new information to the pattern. It will only be applied to this shipping instruction. If you want to save the information that you changed to the pattern, select "Modify BOL" from the "Available Pattern Options" drop down on the top right section of the entry page. If you do not want to change the pattern, but would like to create a new pattern with the information you changed, select "Create Pattern From BOL" from the "Available Pattern Options" drop-down. To delete a pattern, please contact BNSF's eBusiness team at 888-428-2673 option 4, option 1, or send an email to eBizHelp@bnsf.com. We ask that you do this because you may want to delete a pattern that someone else is attached to. eBusiness will simply unattach you from the pattern instead of deleting it so that others may use it. Hazardous DetailsFor customers shipping hazardous commodities, there is an additional page of information to complete. From the "Available Options" drop-down at the top-left section of the Entry page, select "HazMat Entry." If your shipment crosses the Canadian border, you may need to include additional shipping information. To do so, click on 'Canadian'. There are additional fields here that may need to be completed.
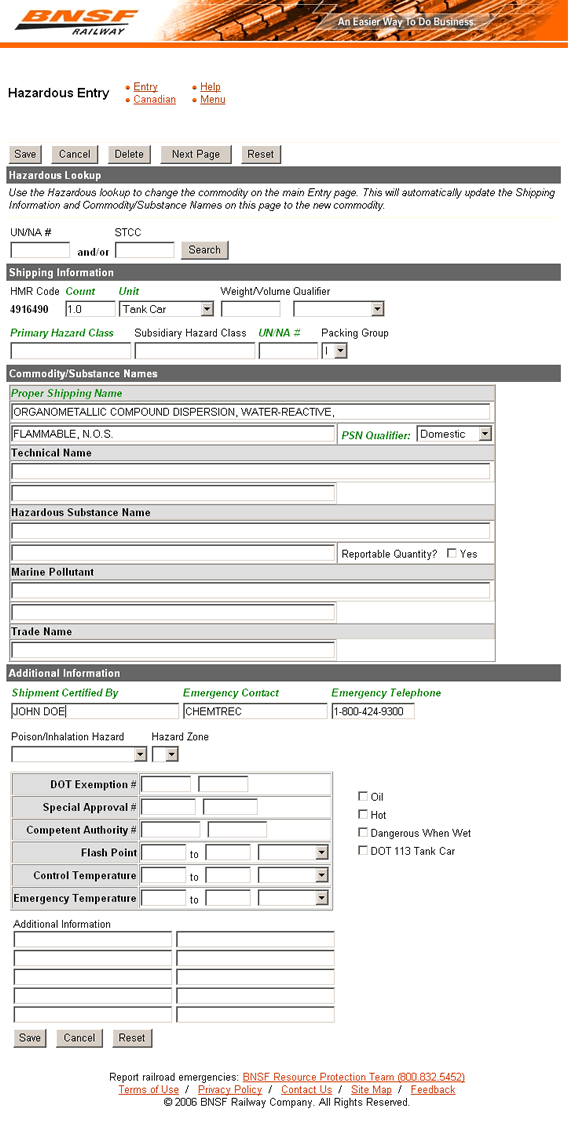
Hazardous LookupAt the top of the HazMat Entry page is a Hazardous Lookup you can use to lookup the hazardous Information for a particular commodity. To use the Hazardous Lookup, enter the STCC (Standard Transportation Commodity Code) or UN/NA Number for the commodity you want to look up and click the "Search" button. You will see a drop-down appear that will allow you to select the Proper Shipping Name and, if applicable, the Technical Name. Once you select the record that applies to your shipment, the hazardous information for that record will automatically populate in the fields below, including UN/NA Number, STCC (or HMR code) Proper Shipping Name, Primary Hazard Class, Subsidiary Hazard Class (if applicable), Technical Name (if applicable), and Packing Group. Please note that currently the packing group will not make a selection if more than one can be selected for the commodity. Please check this field to make sure it is populated correctly before transmitting the Shipping Instruction. You should also check the PSN Qualifier to make sure it is correct as well. Currently the PSN qualifier will populate based on the origin and destination of your shipment. Please also note that you will need to fill in the Count and Unit fields if not already saved in your pattern, as this information does not populate from the Hazardous Lookup. The same also applies to the weight and qualifier fields which apply to loaded shipments. You will also need to enter the Shipment Certified By, Emergency Contact, and Emergency Telephone fields in the Additional Information section if this information is not saved in the pattern as these fields are required and do not populate from the Hazardous Lookup. Equipment DetailsIf you are shipping multiple equipment you may enter the first car on the entry page and enter any additional cars by clicking on the "Add/Del/Modify" button next to Equipment. Click on the [Add] button to add each subsequent piece of equipment for multiple car shipments or unit train shipments. Equipment applied to your shipping instruction is displayed under "Equipment on this Shipping Instructions Document". Update or Delete equipment by clicking on the select box next to one or more select buttons and clicking the [Update] or [Delete] button. If you wish to import multiple cars at once, copy and paste a list of equipment and select the Import option at the top of the page. You can enter multiple equipment initials and numbers with or without weights. Example with weights:
    BN 123456 198000
    BN 123457 199000
    BN 123458 199000
Example without weights:
    ATSF 123456
    ATSF 123457
    ATSF 123458
You can also cut and paste from other applications into the text area. Make sure that there is no data other than the initial, number and weight when pasting into this box. Before pressing the Import button, your data should be formatted in either one of the examples listed above. If your data includes weights, check the box marked "Include Weight". Press the Import button and the equipment will be added to the bill. When you are done making changes, click either the Entry Page option at the top of the page, or the [Done] button at the bottom of the page. Partner DetailsPartner Details should display all parties that apply to the Shipping Instruction. Required partners are:
Optional partners are:
To add, delete or update business partner information, click the "Add/Del/Modify" button next to "Business Partners" on the Entry page. To add a new partner select the partner type from the options list by clicking on the down arrow next to the Partner Type field. Type the partner's business name and other relevant information and click on the [Add] button. To update or delete a business partner, select each record and click the [Delete] button or [Update] button. Click on the [Save] button to preserve the information you have entered. Route DetailsTo enter or modify route information for your shipping instruction, select the "Add/Del/Modify" button next to "Route." Enter the appropriate road(s) and junction(s) abbreviations on the form. To search for proper road and junction abbreviations click the "Railroad & Junction Abbreviations" link from the top of the page. You may not modify the origin road of BNSF. When you have completed your changes press the [Save] button. If you need to provide a reverse route, select "Reverse Route" from the "Available Options" drop-down on the top left section of the Entry page. Miscellaneous DetailsCustoms InformationTo specify Customs Information, select "Customs Information" from the "Available Options" drop-down box. Enter the appropriate data and click the [Save] button. From this page you may select to go to the US Ocean Imports page, the US Ocean Export page, Inbond page or Export License by clicking on your choice at the top of the page. After adding the data to be applied for that Shipping Instruction, click on [Save]. Stop OffsYou may indicate up to six Stop-Offs per Shipping Instruction. To do so, select "Stop-Offs" from the "Available Options" drop-down on the Entry page. Enter the correct information and click the [Save] button. To delete a Stop-Off that has been saved as part of the Shipping Instruction, Click on the Delete radio button for that Stop-Off. Special HandlingTo add up to six Special Handling Instructions on a Shipping Instruction, select "Special Handling" from the "Available Options" drop-down on the Entry page. Make your selections from the drop-down boxes on the Special Handling page and click the [Save] button. Protective ServiceTo add protective services information to a Shipping Instruction, select "Protective Service" from the "Available Options" drop-down on the Entry page. Make the appropriate selections from the drop-down boxes displayed and click on [Save]. Repeat PatternThis option allows you to continue using the current pattern for multiple bills. The current bill must be in a "Not Transmitted" status before using this option. When finished working with the current bill, press Save. The bill will be Saved and validated. If the bill passes all validations, the status will change from Incomplete to Not Transmitted. To begin another bill with the same pattern, click the "Repeat Pattern" link at the top of the Entry page. The original pattern will be loaded for creating another bill. Please note that if you change any patterned data (for example Consignee name or route ) it will not be displayed using the Repeat Pattern feature. Only data from the original pattern will be displayed using Repeat Pattern. Save and TransmitAfter entering the necessary information click on the “Save” button to transmit the bill later, or click on the “Save” button and then “Transmit” button to transmit immediately. Once you have transmitted a shipping instruction, you will want to go to the Summary page to view the status. SummaryThis page displays a summary list of Shipping Instructions that you have recently created in the system. You may shorten the list either by deleting selected records or by specifying new search criteria using the Summary Search page.
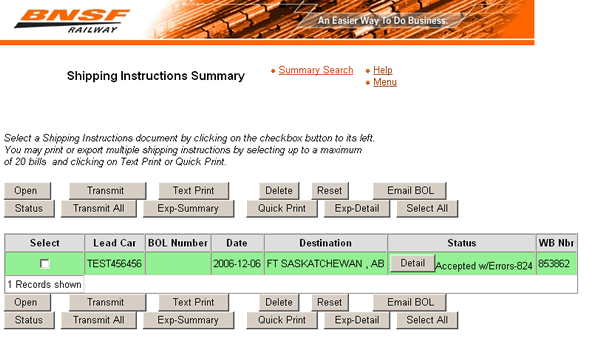
Entries that appear on this page are color coded as follows:
For a more detailed description of the statuses, see Status Descriptions. The ultimate status that you are looking for is "Accepted-824". You will want to keep refreshing your screen until you receive this message, which will give you a waybill number. To refresh your screen click the "status" button. Rejected messages will need to be corrected through the billing center at 888-428-2673 options 3, 2, 3. Shipping Instructions will automatically drop off your summary page seven days after transmitting them. If you want to keep a record make sure you print or email them before the seven days are up. To print a text copy of the shipping instruction, select the unit and click the "Quick Print" button. To email the bill, click "Email BOL." Column Definitions
Button Functionality
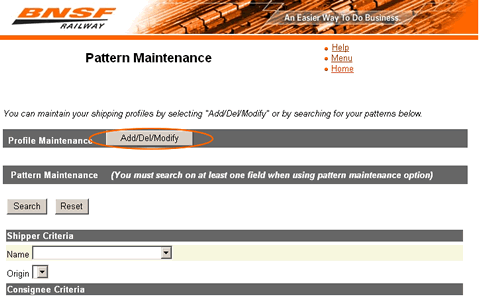
Summary SearchYou may search for previously created shipping instructions by using one or more of the criteria presented. Once you have selected or entered each of the parameters defining your search, click on the [Search] button. You will be brought back to the Shipping Instruction Summary page containing only those documents matching your criteria. The [Reset] button will clear any changes you have made to the Shipment Information Summary Search page and display the original data. ExportPressing the Export button will display information from the bill in a comma delimited file. You can copy and paste this data into your other applications (such as a word processor). If you would like a copy of the export mapping, contact a BNSF employee at 888-428-2673. Text PrintUse this page to override the default title and/or to override the default number of lines per page that will appear on a text-only Shipping Instructions print. By default, the title for the print will be the shipper name for the Shipping Instruction. Click the "Continue" button to see a text-only copy of the Shipping Instruction. The resulting page can then be printed by clicking the printer icon or by selecting File | Print from your browser's menu bar. To eliminate the steps described above and move directly to the Shipping Instructions print, click on the Quick Print button. To print this text, click on your browser's Print icon. Track ListTrack list displays all empty equipment currently in BNSF inventory which is assigned to your account. You may select one or more pieces of equipment for your shipping instruction by clicking on the box to the left of the equipment ID and clicking the [Save] button. To exit without saving, click the [Cancel] button. Track List SearchIf you have equipment that is located in more than one track you may search by track number and load/empty status. To search select Shipper Name and Location (if there are more than one) and key in your track number. You may select all empties, all loads or both loads and empties from the load/empty drop down box. Once you have selected your criteria click on [Search]. This will bring up your previous page and display all equipment matching your search criteria. To exit without saving, click the [Cancel] button. The [Reset] button will clear any changes you have made to the Track List Search page and display the original data. Pattern MaintenanceTo create or modify a pattern, select the �Pattern Maintenance� option. This feature allows you to build new origins, destinations and consignees as well as update existing patterns.
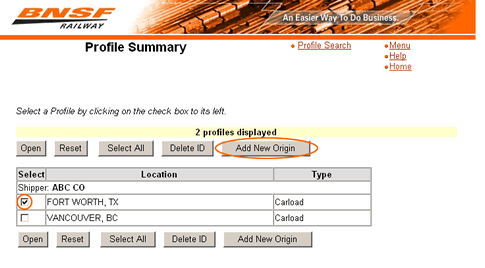
Add New Origin PatternOn the Pattern Maintenance page, click the "Add/Del/Modify" button next to Profile Maintenance.
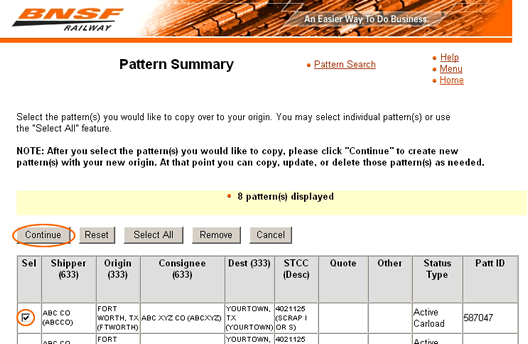
Select an existing origin to copy and click the "Add New Origin" button.
A list of all of the patterns for the selected origin will be displayed. Select the pattern that most closely matches the information you would like to save in the new origin pattern and click "Continue".
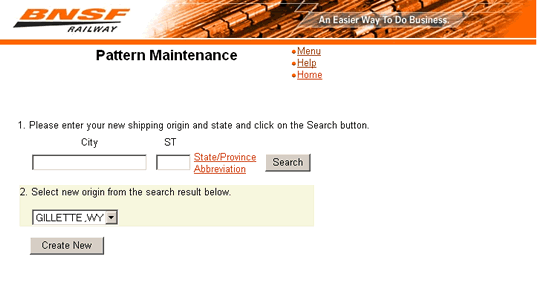
On the following page search for you new origin. A list of possible matches will be displayed. Choose the correct new origin and click �Create New�.
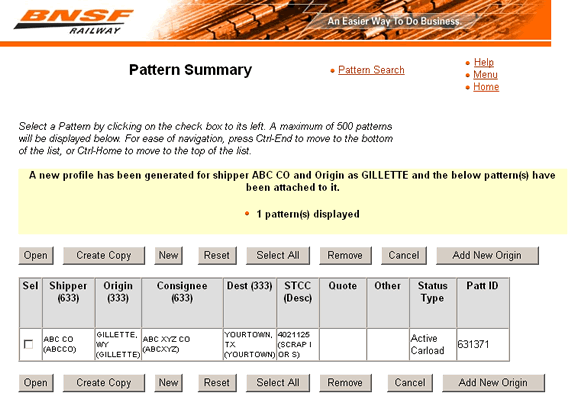
The following page will display your selected pattern with your new origin. To make changes to the pattern, click the open button, make your changes and save the pattern.
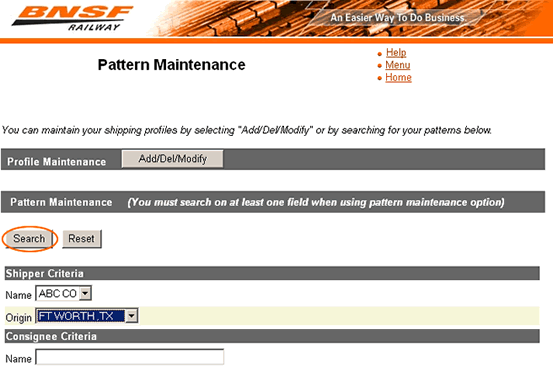
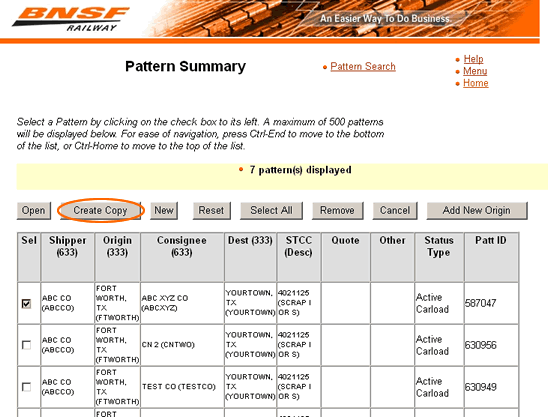
New Patterns Other than OriginIf you would like to create a new pattern for a new Consignee, Destination, STCC or Other Customer Defined field, follow the steps below. If you need a pattern with a new Shipper name, please contact BNSF's eBusiness group at 888-428-2673 options 4 and 1. Pattern SearchFrom the Pattern Maintenance page, perform a pattern search by entering the desired criteria in the search fields.
The list of patterns from the search criteria will be displayed. The best way to create a new pattern is to copy an existing pattern and change the information on the new copy. Select the pattern that most closely resembles the new pattern you want to create.
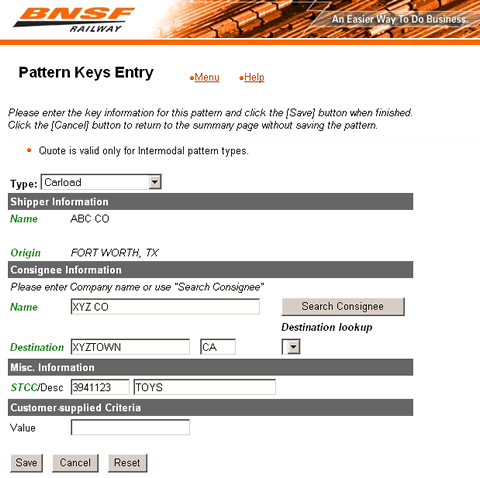
Make the necessary changes for the new pattern and click the "Save" button.
Finally, make any necessary changes or additions to the pattern detail information and click "Save". |