


|
 Reciprocal Switch Help
|
|
||||
| Billing Detail | BNSF Projected Billing |
|
||
| Enter New Bill |
|
|||
| Enter New Exception | Search | |||
| Enter New Claim | Search Results |
Reciprocal Switch is a BNSF.com tool that allows you to view, insert, and in some cases update bills, exceptions, and claims for reciprocal switching between BNSF and a Foreign Carrier.
In this example, ABC is the name of the foreign road the user “Test User ” is associated with. Users are allowed to be associated with only one road.The first link is ABC Billing. This link provides information regarding our accounts payables due to ABC or accounts receivables from the ABC ’s perspective. These are ABC bills available for payment by BNSF. This link allows the ABC user to view, update and add new records for the current accounting month and year. In addition, the user is allowed to view prior months billing. If a billing disagreement exists, each road has the right to issue an exception to a bill. Furthermore, if a disagreement exists regarding an exception, each road has the right to issue a claim against the exception. The billing screens allow the foreign road user to initiate exceptions and claims as well.
Billing Summary
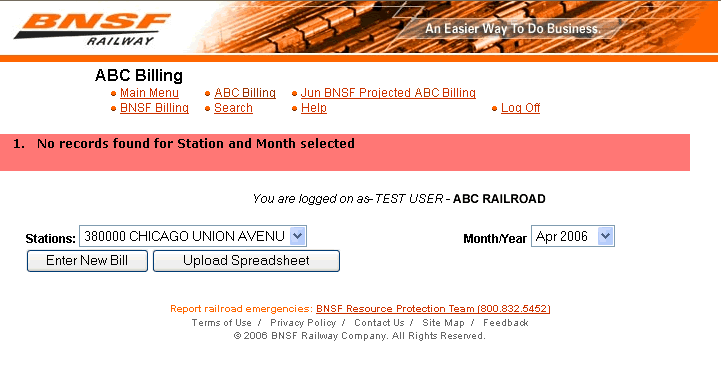
This page will display the current receivables as submitted. Also you can update the existing receivables or add the new receivables through this page. The receivables will be displayed based on the Station selected from the Stations select box and the Month selected from the Month/Year select box. If there are no records pertaining to the selected Station and the selected Month, the message “No records found for Station and Month selected” will be displayed just below the page header. See example below:
If there are any records pertaining to the selected Station and the selected Month, the data will be displayed in the tabular format. The data contains the quantity and amount of the Received, Forwarded and Intermediate Bills, Exceptions and Claims. Also the sum of the quantity and the amount will be displayed as the “Total” column at the end of the table. The data for the “Pending Claims” will be shown if the selected month is the latest month. The Enter New Bill, Process Payments and Upload Spreadsheet buttons will only appear in the screen if the selected month is the latest month. See example below:
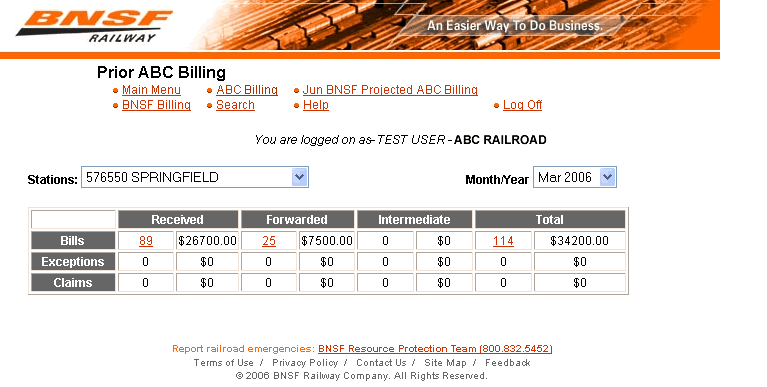
NOTE: The Enter New Bill, Process Payments and Upload Spreadsheet buttons will disappear if you select the month other than the latest month. Also the title of the page will be changed to Prior Billing if you select a month 2 or more months previous to the current month (i.e., if the current month is August, months June or earlier would constitute the “Prior” heading). See example below:
Billing Detail
NOTE:You get to this screen by clicking on one of the hyperlinks associated with the number of bills, exceptions or claims
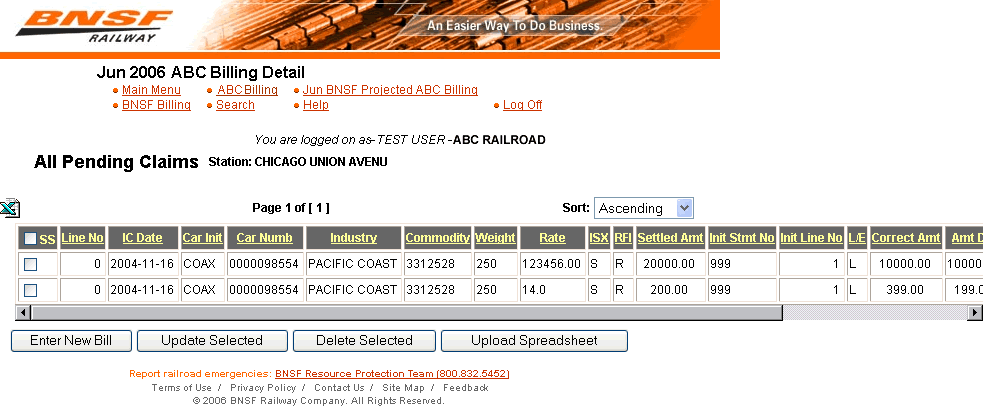
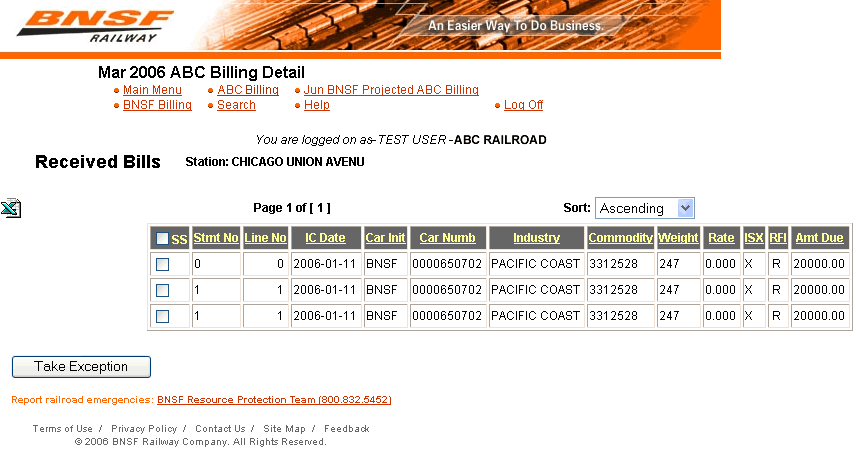
This page shows detailed information for each receivable displayed. The information will be displayed in the tabular format. You can also view the information in the Excel format through this page. If you have come to this page from the “Billing” page with the latest month as the selected Month, then you can also view the Enter New Bill, Update Selected, Delete Selected and Upload Spreadsheet buttons. You can also select a record to Take Exceptions or to Make a Claim only if the selected month is 2 or more months previous to the current month. If the selected month in the “Billing” page is not the latest Month, then you will be not able to view these buttons. The page also allows you to Sort information and view Page Numbers depending on the amount of content. See examples below:
Current Month Billing Detail
Prior Month Billing Detail
Enter New Bill
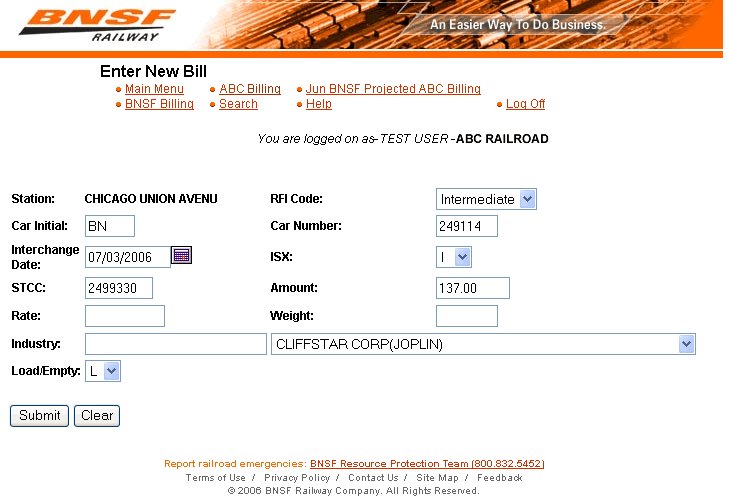
This page will allow you to insert the new Bill in the database.You can get to this screen by clicking on the button labeled “Enter New Bill” on either the Billing Summary screen or the Current Month Billing Detail screen. See below for example:
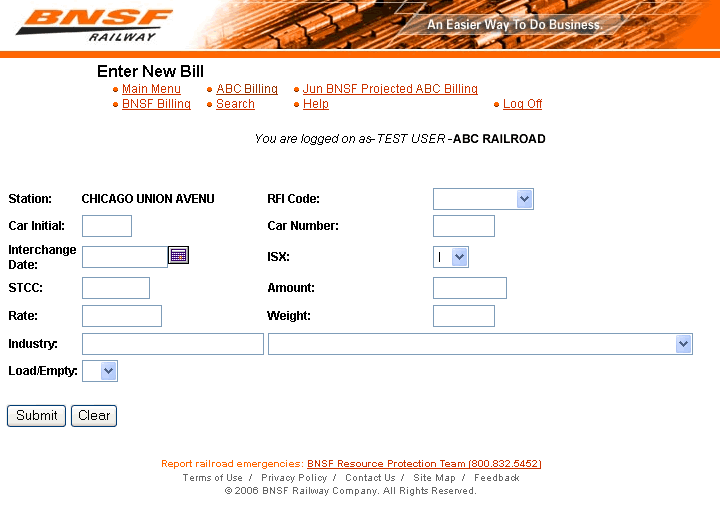
The following are required field that need to be filled out be for entering the new bill.
Field Descriptions
RFI Code, Car Initial, Car Number, Interchange Date, ISX, STCC, Amount, Rate, Weight, Industry Name, Load/Empty
All fields must be completed in order to Submit the new bill. You also have the option to Clear all of the fields. See example:
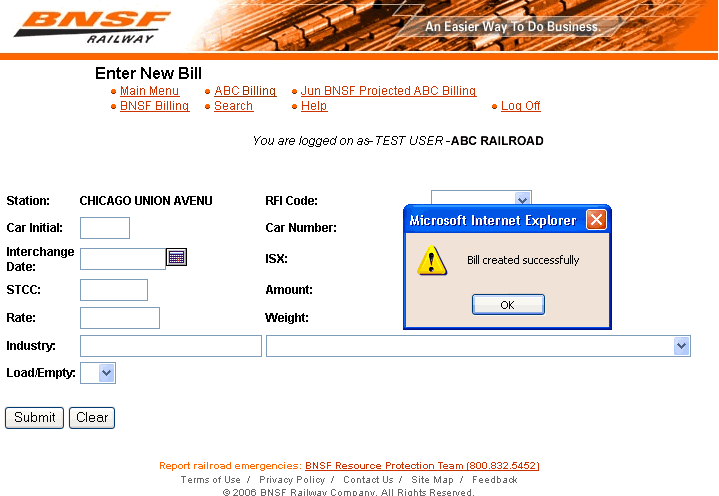
Results:
Update Bill
This page will allow you to modify the selected Bill.You can get to this screen by clicking the link Received, Forwarded or Intermediate Bills/Exceptions/Claims link on the Current Billing summary screen when the latest Month/Year is selected.This page will allow you to edit and update the bill. All fields must be completed in order to Submit the new bill. You also have the option to Clear all of the fields.
Top of PageEnter New Exception
This page will allow you to insert the new Exception in the database for the selected Bill.You get to this screen by clicking the Take Exception button on the Prior Month Billing Detail screen after you have checked the box to a record as shown below:
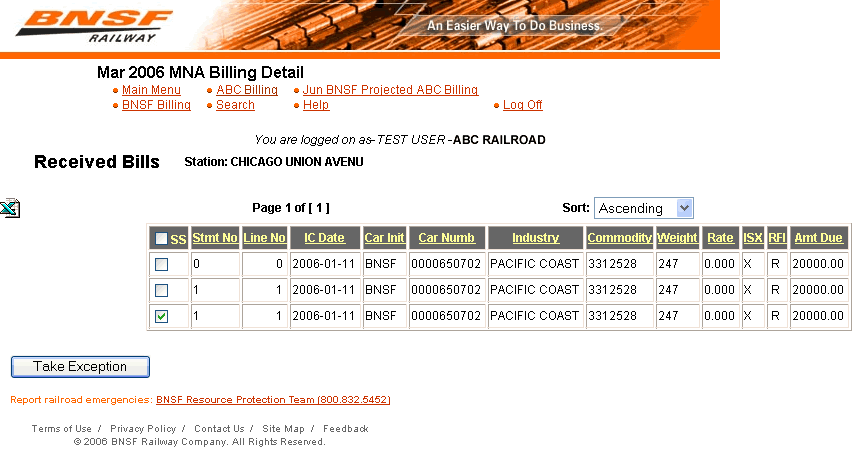
Click on the Take Exception button to see the screen below:
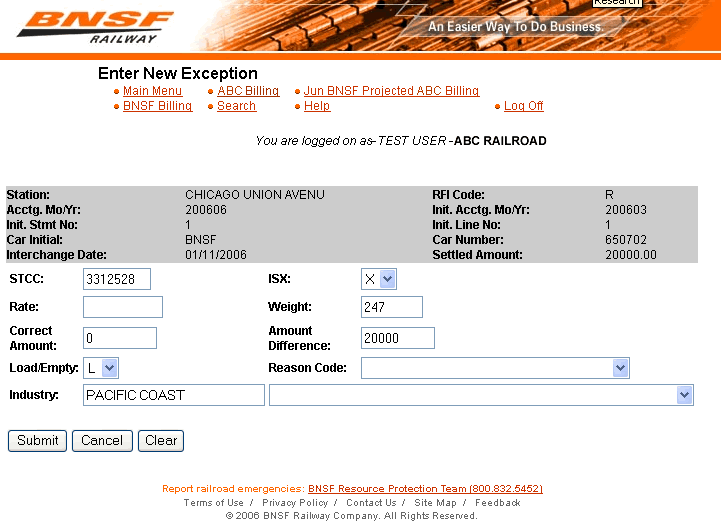
Make sure all previous fields are filled out correctly with addition to the Correct Amount, Amount Difference, and Reason Code fields. All fields must be completed in order to Submit the new bill. You also have the option to Cancel or Clear all of the fields. See examples below:
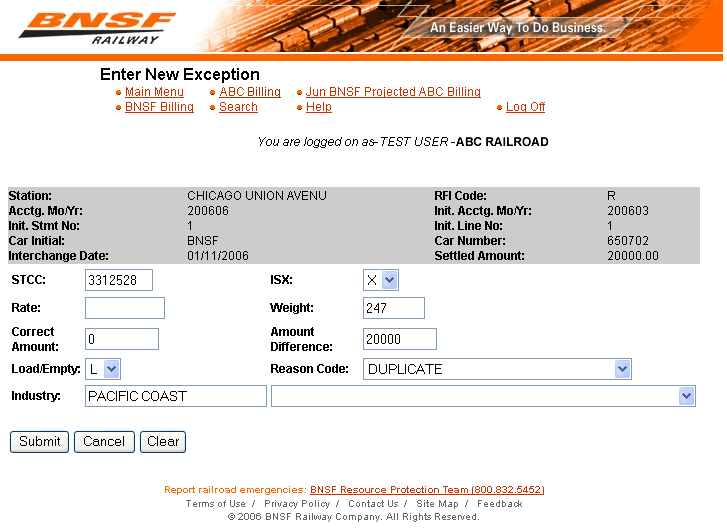
Result:
Note: You can also create a new exception from the Prior BNSF billing screen.
Update Exception
This page will allow you to modify the selected Exception. You can get to this screen by clicking the link Received, Forwarded or Intermediate Bills/Exceptions/Claims link on the Billing summary screen when the latest Month/Year is selected. This page will allow you to edit and update the exception. All fields must be completed in order to Submit the new bill. You also have the option to Clear all of the fields.
Enter New Claim
This page will allow you to insert the new Claim in the database for the selected Exception. You get to this screen by clicking the Make Claim button on the Prior Month Billing Detail screen. Creating a claim requires the existence of an exception in the exception table. Click on the link associated with number of Exceptions
Resulting Screen:
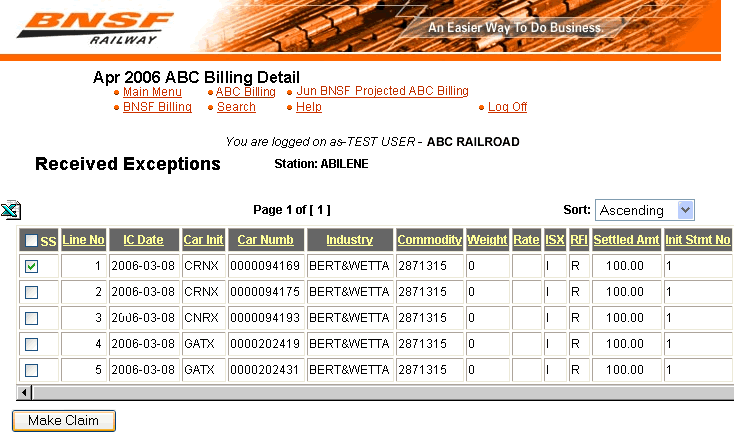
Activate the checkbox to the left of the record and click on the “Make Claim” button as indicated above.The following are required field that need to be filled out be for entering a new claim.
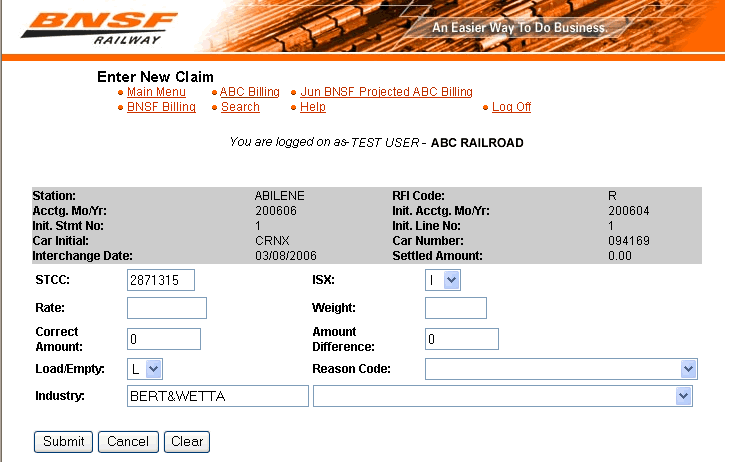
STCC, ISX, Rate, Weight, Correct Amount, Amount Difference, Load/Empty, Reason Code, Industry Name
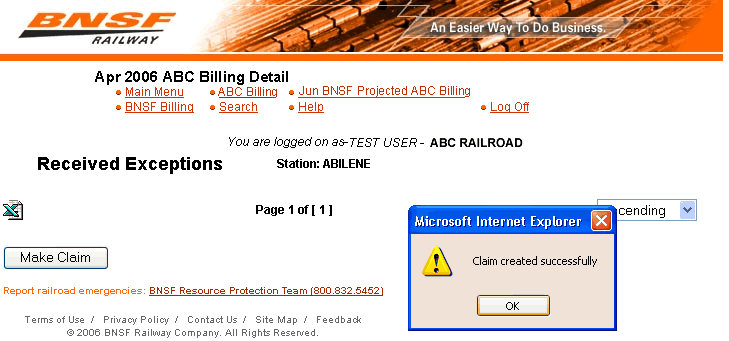
All fields must be completed in order to Submit the new bill. You also have the option to Clear all of the fields.
Note: You can also create a new claim from the Prior BNSF billing screen.
Update Claim
This page will allow you to update the selected Claim.You can get to this screen by clicking the link Received, Forwarded or Intermediate Bills/Exceptions/Claims link on the Billing summary screen when the latest Month/Year is selected. This page will allow you to edit and update the claim. All fields must be completed in order to Submit the new bill. You also have the option to Clear all of the fields.
Upload Spreadsheet
This page helps in uploading the Excel Spreadsheet file (with “.xls” extension). See example below:
You can also click on browse to view your existing files.The Spreadsheet should contain the list of Bills, Exceptions or Claims you want to insert in the database. You need to provide the full path and the name of the Excel file you want to upload and the comma separated list of the Email addresses. The Email addresses will be used to notify the status of your upload. See example below:
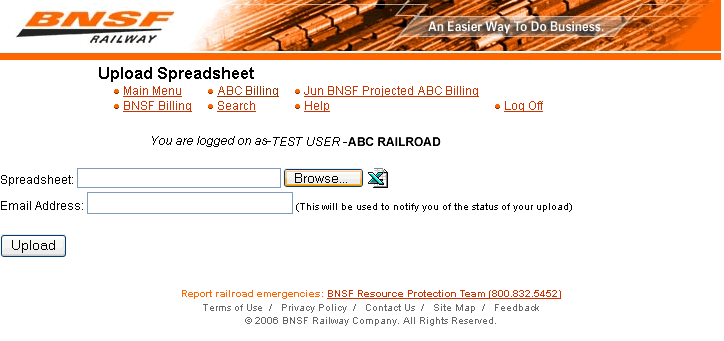
You can also view the Upload Spreadsheet Template which defines the format of the Excel Spreadsheet to be uploaded. There are specific requirements for the Excel spreadsheet. A formatted spreadsheet may be obtained by contacting your ISA (Interline Switch Accounting) representative.To choose the file desired to be loaded, click on the “Browse” button as indicated above.Resulting screens:
Press the “Upload” button as indicated.Resulting screen:
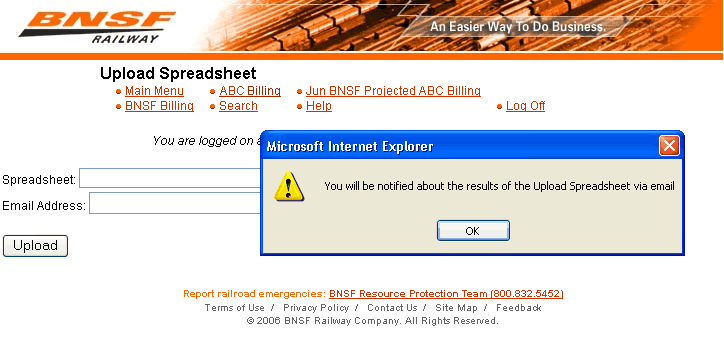
E-mail Results:

BNSF Projected Billing
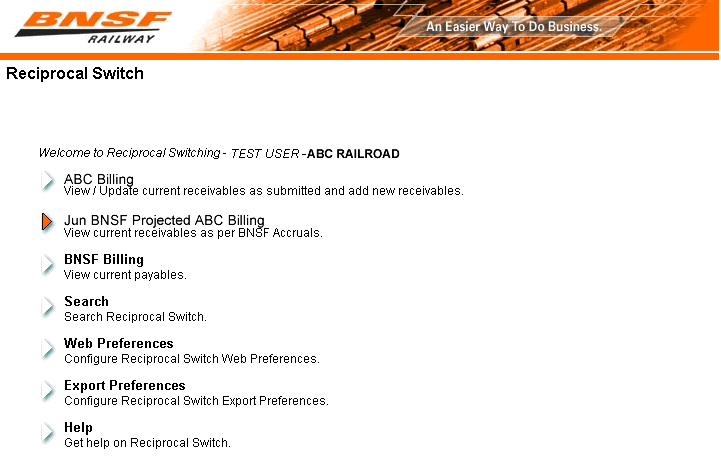
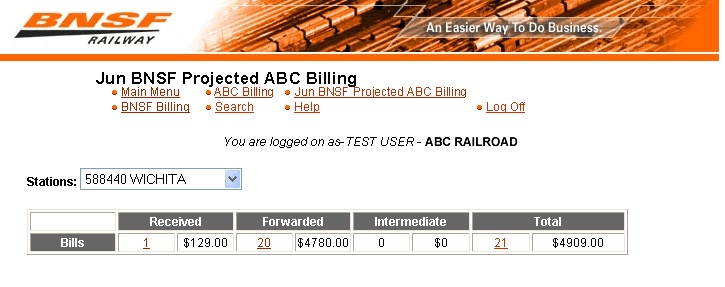
This page will display the current receivables as per BNSF Accruals. The receivables will be displayed based on the Station selected from the Stations select box. If there are no records pertaining to the selected Station, the message “No records found for Station selected” will be displayed just below the page header. If there are any records pertaining to the selected Station, the data will be displayed in the tabular format. The data contains the quantity and amount of the Received, Forwarded and Intermediate Bills, Exceptions and Claims. Also the sum of the quantity and the amount will be displayed as the “Total” column at the end of the table.The Projected Billing is what BNSF thinks they owe you. If you accept the amount, then you can create a bill. In this example to create a bill, just click on the "Total" number which is 21. Place a check in the boxes next to the accepted bills and click "Create Billing". Shown below:
After the bills have been created, the bills will go into the BNSF Billing status. If you do not accept the amount, then you can create a new bill or upload through a spreadsheet.
BNSF Billing
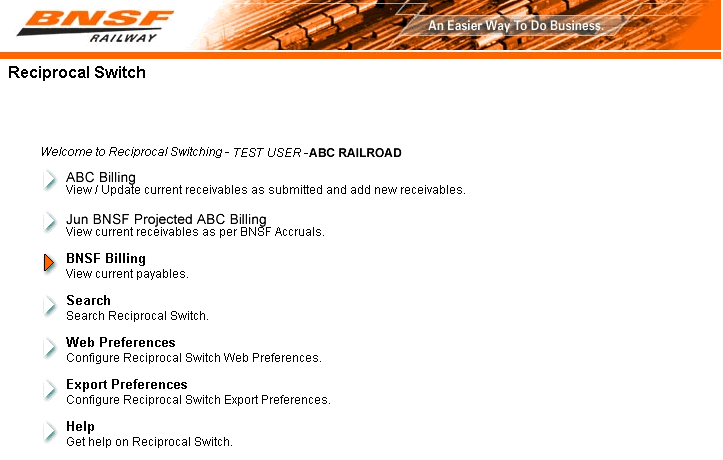
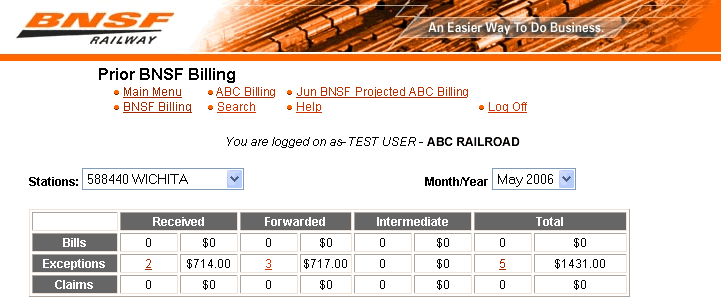
This page will display the current payables. The payables will be displayed based on the Station selected from the Stations select box and the Month selected from the Month/Year select box. If there are no records pertaining to the selected Station and the selected Month, the message “No records found for Station and Month selected” will be displayed just below the page header. If there are any records pertaining to the selected Station and the selected Month, the data will be displayed in the tabular format. The data contains the quantity and amount of the Received, Forwarded and Intermediate Bills, Exceptions and Claims. Also the sum of the quantity and the amount will be displayed as the “Total” column at the end of the table.
Search
This page allows you to search for Bills, Exceptions and claims. See example below:

Search can be made based on the criterions: Billing Road, Billing Type, Month / Year and Stations. Apart from this, it allows you to search by one of four identifiers: Equipment ID, InterchangeDate, STCC and Industry Name.
For help on the results of the search, refer to Search Results. If there are no results fetched based on your search criterions, the message “Please perform the search with a different set of Search Criteria’s” will be displayed in the Search Results page. After you fill out the appropriate field you have to choice to left click on Search or Clear.
Search Results
This page shows the results from a search.See below:
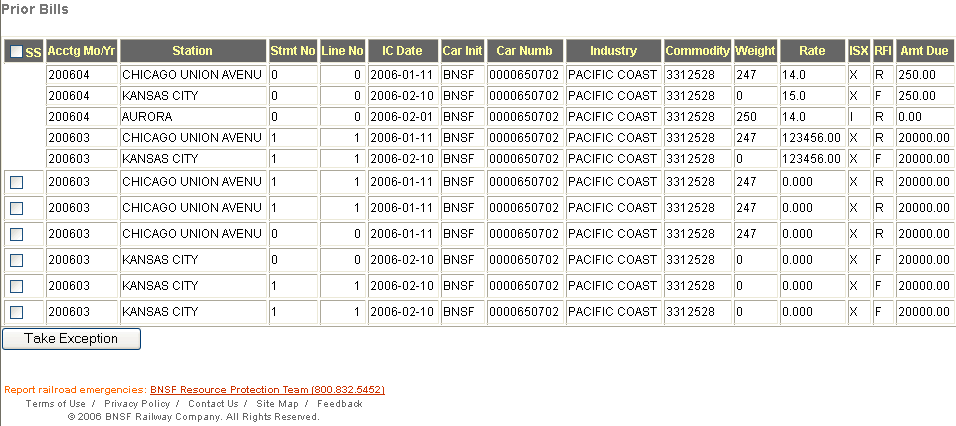
The results will be displayed in the tabular format. Depending upon the Search criterions you can view the Enter New Bill, Update Selected, Delete Selected, Upload Spreadsheet, Take Exception and Make Claim buttons.
Top of PageWeb Preferences

This page allows you to customize the Billing screens of Reciprocal Switch. You can choose which Billing screen you would like to customize: These screens are: Road Billing, BNSF Projected Billing and BNSF Billing. With the help of this page, you can select the columns you want to view, you can change the sequence of the columns displayed or you can set the sort order of your preference. The following fields give you that ability to customize your Reciprocal Switch application.
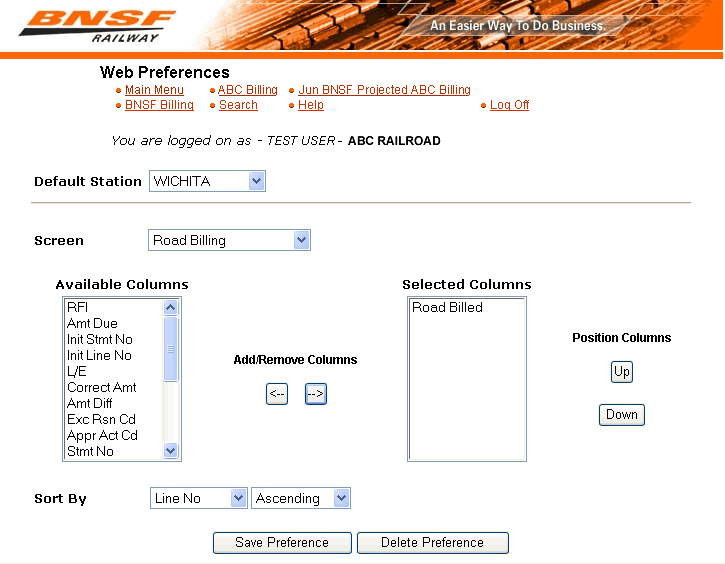
Default Station, Screen, Available Columns, Selected Columns, Add/Remove Columns, Position Column, Sort
After customizing appropriate field(s) you have the option to Save Preference or Delete Preference.
Top of PageExport Preference

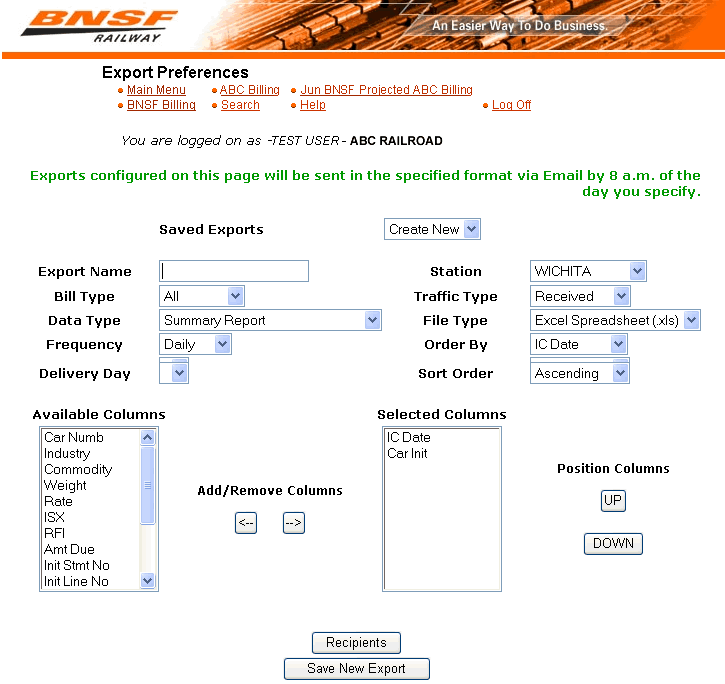
The data contained on this screen is used for electronically sending reports to customers. In essence, the available reports will be an Excel spreadsheet that is a printable version of anything viewable on a detail screen. Example: All the bills of traffic type received for a particular station for the current month. There is no limit to the number, type, or frequency of reports to be requested. Each report is defined and named by the user (see “Export Name). Part of the definition indicates when the user would like the spreadsheet emailed to them. The following fields give you that ability to customize your Reciprocal Switch application.
Export Name Text Box, Choice Boxes, Save Exports, Stations, Bill Type List Box, Traffic Type, Data Type, File Type, Frequency, Order By, Deliver Day, Sort Order, List Boxes, Available Columns List Box, Selected Columns List Box, Add/Remove Columns.
After customizing appropriate field(s) you have the option to Save Export or Delete Export.
Result Screen:
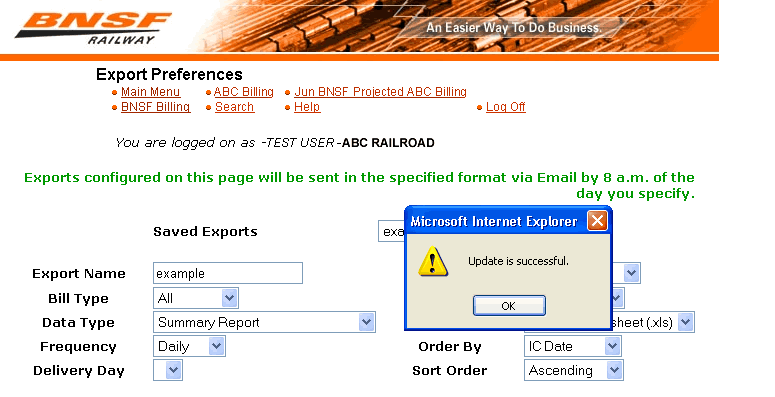
Recipient List
After updating export information, you can click on "Recipient" button to update recipient's name, phone number and e-mail address information for a report.
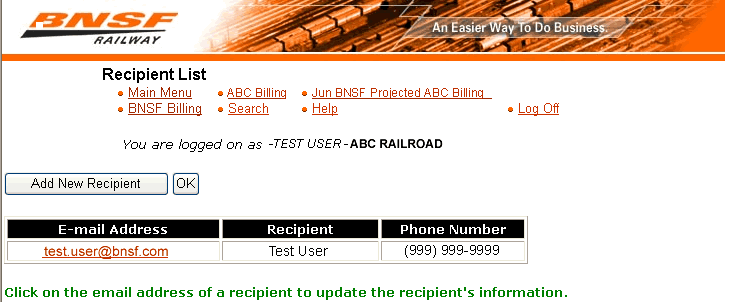
After updating the infromation, you have the option of adding a New Recipient or clicking OK.Recipient Information
If you click on the "Add New Recipient" button, this page allows recipient information to be updated or added for a report.
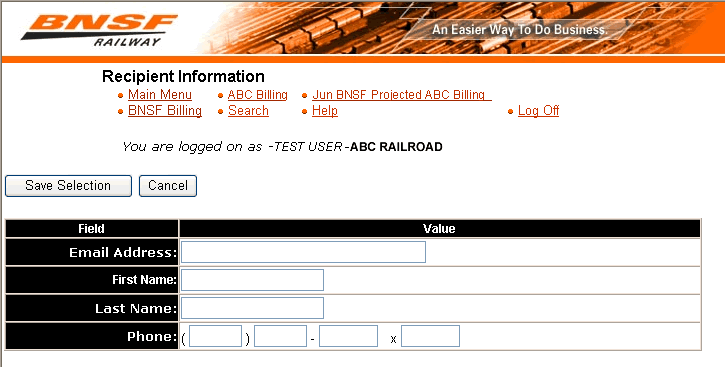
The following fields are used to update information.
Field DescriptionsE-mail Address Text Box, First Name Text Box, Last Name Text Box, Phone Text Box
After customizing appropriate field(s) you have the option to Save Selection or Cancel.
Field Descriptions:
Stations-This field contains a select box which lists the names of the stations. You can select any one of these stations to view the records pertaining to the selected station. If there is no data pertaining to the selected station, the message “No records found for Station and Month selected” will be displayed just below the page header.
Month/Year-This field contains a select box which lists the past latest seven months excluding the current month. You can select any one of these months to view the records pertaining to the selected month
Bills- If the quantity of the Received, Forwarded, Intermediate or Total Bills is more than zero, that particular quantity will appear as the hyperlink
(underlined text). By left clicking on the hyperlink, you will be taken to the Billing Detail screen.
Exceptions- If the quantity of the Received, Forwarded, Intermediate or Total Exceptions is more than zero, that particular quantity will appear as the hyperlink ( underlined text). By left clicking on the hyperlink, you will be taken to the Billing Detail screen.
Claims- If the quantity of the Received, Forwarded, Intermediate or Total Claims is more than zero, that particular quantity will appear as the hyperlink
(underlined text). By left clicking on the hyperlink, you will be taken to the Billing Detail screen.
Sort- This field contains a select box which has two values, ‘Ascending’ and ‘Descending’. You can select any of these values to sort the data. To select a sort value, left click on the arrow on the right of the box. Then these two sort values, ‘Ascending’ and ‘Descending’ will be displayed: Then left click on any of these sort values. The selected sort value will be displayed. After that if you click the column heading of the column that you want to sort, the data will be sorted in the selected sort order.
Page Number-If the numbers of records are more than fifty, the data will be displayed in more than one page. Maximum of fifty records can be displayed on one page at any point of time
RFI Code- This field contains a select box which has three values for the RFI code, ‘Received’, ‘Forwarded’ and ‘Intermediate’. You have to select one of these codes. To select a different RFI Code, left click on the arrow on the right of the box. The list of the RFI codes will be displayed: Then left click on the RFI Code you want to select. RFI code is mandatory.
Car Initial- This is a text box where you can type in the value of Car Initial. You can type in maximum of four characters in this text box. Car Initial is mandatory.
Car Number- This is a text box where you can type in the value of Car Number. You can type in maximum of six characters in this text box. Car Number should be numeric. Car Number is mandatory.
Interchange Date- This is a text box where you can type in the value of Interchange Date. The date entered should be either in the ‘mm/dd/yy’ format or in the ‘mm/dd/yyyy’ format. Interchange Date is mandatory. You can also
choose the Interchange Date from the calendar pop up by left clicking on the image (). The use of calendar pop is described below.
ISX- This field contains a select box which has three values for the ISX code, ‘I’, ‘S’ and ‘X’. You have to select one of these values. To select a different ISX Code, left click on the arrow on the right of the box. The list of the ISX codes will be displayed: Then left click on the ISX Code you want to select. ISX code is mandatory.
STCC- This is a text box where you can type in the value of STCC Code. You can type in maximum of seven characters in this text box. STCC entered should be numeric. STCC code is mandatory.
Amount- This is a text box where you can type in the value of Amount. Amount entered should be numeric. Currently, Amount should be between 0 and 9999.99. This range is subject to change. Amount can have maximum of 2 decimal places. Amount is mandatory.
Rate- This is a text box where you can type in the value of Rate. Rate entered should be numeric. The value of Rate should be greater than zero. You can type in maximum of 8 digits in this text box. Rate can have maximum of 2 decimal places. Rate is not mandatory.
Weight- This is a text box where you can type in the value of Weight. Weight entered should be numeric and a whole number. The value of Weight should be greater than zero. You can type in maximum of 6 digits in this text box. If the value of Rate is less than 15 then Weight is mandatory.
Industry Name- This field contains a text box as well as a select box. You can either type in the value of the Industry Name in the text box or choose the name from the select box. The select box contains the list of the Industry Names. To select a different Industry Name, left click on the arrow on the right of the box. The list of the Industry Names will be displayed: Then left click on the Industry Name you want to select. If you want to type in the Industry name you can type in maximum of 26 characters in this text box. Industry Name is mandatory.
Load/Empty-This field contains a select box which has two values for the ‘Load / Empty’: ‘L’ and ‘E’. You have to select one of these values. To select a different ‘Load / Empty’, left click on the arrow on the right of the box. The values for the ‘Load / Empty’ will be displayed: Then left click on any value you want to select. ‘Load / Empty’ is mandatory.
Equipment ID- This is a text box where you can type in the value of Equipment ID. Equipment Init and Equipment Number entered should be in the “AAAA ######” format.
Correct Amount-This is a text box where you can type in the value of Correct Amount. Correct Amount entered should be numeric. Currently, Correct Amount should be between 0 and 9999.99. This range is subject to change. Correct Amount can have maximum of 2 decimal places. Correct Amount is mandatory.
Amount Difference- This is a text box. You can not type in this text box. It will just display the difference between the ‘Settled Amount’ and ‘Correct Amount’.
Reason Code- This field contains a select box which has the values for Reason Code. You have to select one of the values from this select box by left clicking on the value. Reason Code is mandatory.
Spreadsheet- This is a text box where you can type in the full path and the name of the Excel file you want to upload. If you select the file by clicking on the “Browse” button the path and the name of the file will directly appear in this text box. The use of the “Browse” button is explained below.
Email Address- This is a text box where you will type in the full Email address. If you want to enter more than one Email address, separate each Email address with comma (,). You can specify only up to 5 Email addresses in this text box. The status of your upload will be notified to the Email addresses that you will mention in this text box.
Billing Road-This field contains a select box which lists the values for the Billing Road. You need to select one of these values. To select a different Billing Road, left click on the arrow on the right of the box. The list of the Billing Roads will be displayed: Then left click on the Billing Road you want to select. The search will be made on the basis of the value selected.
Billing Type- This field contains a select box. It allows you to choose one of the Billing Type values: “All”, “Bill”, Exception” and “Claim”. To select a different Billing Type, left click on the arrow on the right of the box. The list of the Billing Types will be displayed: Then left click on the Billing Type you want to select. Search will be made on the basis of the value selected. If you select “All”, search will be made on the basis of all the three Billing Types: Bill, Exception and Claim.
Default Station- This field contains a select box which lists the values for the stations available for the Billing screens. To select a different Default Station, left click on the arrow on the right of the box. The list of the Stations will be displayed. Then left click on the Station you want to set as default. Once you save the preference, the selected Default Station will always be displayed as the default station in the “Stations” select box in all the three Billing Screens.
Screen- This field contains a select box which lists the values for the Billing Screens. You can select one of the Billing Screen values: “Road Billing”, “BNSF Projected Billing” and “BNSF Billing”. To select a different Billing Screen, left click on the arrow on the right of the box. The list of the Billing Screens will be displayed. Then left click on the Billing Screen you want to select. Then you can set the preferences for the selected screen.
Available Columns- This select box displays all columns that are available for the selected Billing screen that are not currently selected to be displayed. ANY COLUMN IN THIS LIST WILL NOT BE DISPLAYED ON THE SELECTED SCREEN. To highlight a column in the list, left click on the text of the desired column.
Selected Columns- This select box displays all columns that are currently chosen for display on the selected Billing screen. The columns in this box are displayed in the order that they will appear on the selected Billing screen. To highlight a column in the list, left click on the text of the desired column.
Add/Remove Columns- These two buttons will move selected columns back and forth from the Selected Columns and Available Columns lists. Left clicking the button with the left pointing arrow will move the highlighted column from the Selected Columns list to the Available Columns list: Removing the column. Left clicking the right pointing arrow will move the highlighted column from the Available Columns list to the Selected Columns list: Adding the column.
Position Column: These two buttons change the position of the columns in the Selected Columns list, and therefore the order that they will be displayed on the selected Billing screen. Left clicking the Up button will move the highlighted column up one position in the list. Left clicking the Down button will move the highlighted column down one position in the list.
Sort- This field has two select boxes. One holds the list of the columns and another select box contains the sort order values: Ascending and Descending. These select boxes allow you to choose what column you would like the selected screen to order its table by in what sort order.
Export Name Text Box- Each report must have a unique name along with its associated selection criteria. This meta data will be used to build the report and export (email) it to the user.
Choice Boxes- A choice box is a field that offers several lines of items to choose from. Unlike a list box, the choice box allows you to choose one and only one element from the list. To choose an element, left click on the box and the list drops down. Place the cursor over the desired element to highlight; release mouse button. Each choice box is described below.
Save Exports- The first time to this screen, the only element in this choice box will be “Create New”. Upon defining and saving a new report, the list of available elements in this choice box will increase. Whatever you type in the “Export Name” text box when you save a new report is what will appear in this choice box. “Create New” will always be one of the elements in this choice box.
Stations- This choice box will be populated with a pre-defined subset of only those stations relating to the foreign road the user is associated with. Choose a station for which you would like data pulled on the report you are in the process of defining.
Bill Type List Box- The report may be comprised of bills only, claim only, exceptions only, or all records associated with the desired station for the road.
Traffic Type- The report may be for one of three traffic types: received, forwarded, or intermediate.
Data Type- The report may consist of summary or detail data of various months. Choose summary for the most recently closed monthly data or detail data for the month of you’re choosing.
File Type- The report may be formatted for a Microsoft Excel spreadsheet or simply a text file which has been comma delimited to be used with software other than MS Excel
Frequency- The report may be emailed everyday, once a week, or once a month.
Order By- This select box allows you to choose what column you would like the selected report to order its table by. This is only the default, and you will be able to order by any available field.
Delivery Day-The report may be delivered as follows: When the Frequency choice box is set to weekly, the Delivery Day box will have the days of the week to choose from. When the Frequency choice box is set to Monthly, the Delivery Day allows the user to choose a calendar date of the month.
Sort Order- Some columns on this page can be sorted in Ascending or Descending order. To sort a column, left click the desired Sort radio button (Ascending or Descending), then left click the column heading of the column that you want to sort (The mouse cursor will become a hand when the mouse is over a sort-able column heading).
List Boxes- A list box is a field that offers several lines of items to choose from. In addition, a list box allows for multiple choices within the set of choices. To select one item in the list box, left click on the desired item and it will become highlighted. To choose a subset of the set of choices: Highlight the first desired item. Hold shift key down while highlighting items directly above or below, or control key and highlight non-consecutive items. Each list box is defined below.
Available Columns List Box- This select box lists all the possible columns to appear on a report. To highlight a column in the list, left click on the text of the desired column. To select a column, left click on the arrow on the right of the box. It will then be removed from this box and appear in the Selected Columns List Box.
Selected Columns List Box- This select box lists all the columns you have chosen to appear on the report you are in the process of defining. To highlight a column in the list, left click on the text of the desired column. To remove a column, right click on the arrow on the left of the box. It will then be removed from this box and reappear in the Available Columns List Box
Add/Remove Columns- These two buttons will move selected columns back and forth from the Selected Columns and Available Columns lists. Left clicking the button with the left pointing arrow will move the highlighted column from the Selected Columns list to the Available Columns list: Removing the column. Left clicking the right pointing arrow will move the highlighted column from the Available Columns list to the Selected Columns list: Adding the column.
E-mail Address- This is a hyperlink. Left click on the individual’s email address to update their contact information. Please see Recipient Information for screen definition.
Recipient Box- The user’s name
Phone Text Box- The user’s phone number
E-mail Address Text Box-The email address the user would like communication sent to. There is a fifty character limit for this text box. This is a required field.
First Name Text Box- The user’s first name. Up to eighteen characters are allowed in this text box. This is a required field.
Last Name Text Box- The user’s last name. Up to eighteen characters are allowed in this text box. This is a required field
Top of PageAction Buttons
Enter New Bill- Left clicking on this button will take you to the “Enter New Bill” screen. This screen will help you in inserting the new bills.
Process Payments- Left clicking on this button will pop up the message “Are you sure you want to finalize all the Bills/Exceptions/Claims for the selected Accounting Mo/Yr?” on the screen. If you left click on the “OK” button on the pop up, the Bills, Exceptions and the Claims will be finalized for the selected month and year i.e. the user will not be able to update or delete these Bills, Exceptions and Claims anymore.
Upload Spreadsheet- Left clicking on this button will take you to the Upload Spreadsheet screen. This page will help you in uploading the Excel Spreadsheet file (with “.xls” extension).
Updated Selected- This button will appear on the screen only if you have come to this screen from the Billing screen with the latest month as the selected month. You can put a check mark for any one of the records you want to update. Then left clicking on this button will take you to the “Update Bill” screen. This screen will help you in updating the selected record.
Delete Selected-This button will appear on the screen only if you have come to this screen from the Billing screen with the latest month as the selected month. You can put a check mark for any one of the records you want to delete. You can select more than one record by putting the check marks. Then left clicking on this button will pop up the message “Are you sure you want to delete the chosen records?” on the screen. If you left click on the “OK” button on the pop up, the selected records will be deleted.
Take Exception-You can put a check mark for any one of the records. Then left clicking on this button will take you to the "Enter New Exception"screen. This screen will help you in adding new Exception for the corresponding Bill.
Make Claim- You can put a check mark for any one of the records. Then left clicking on this button will take you to the" Enter New Claim" screen. This screen will help you in adding the new Claim.
Upload Spreadsheet- This button will appear on the screen only if you have come to this screen from the Billing screen with the latest month as the selected month. Left clicking on this button will take you to the Upload Spreadsheet screen. This page will help you in uploading the Excel Spreadsheet file (with “.xls” extension).
Image Icon () - You will view this icon at the left top corner of the table. If you take the mouse cursor over this image, the mouse cursor will become a hand and you will see a label “Preview In Excel” along with the hand. Clicking on this image will open another window which will display all the data in the Excel Format.
Submit- Left clicking on this button will first validate the Bill information provided by you. If the information is not valid it will prompt the appropriate messages on the screen. If the information is valid then it will try to insert the record. If there is any problem in inserting the record, the appropriate message will be shown below the page header. If the record is successfully inserted, it will prompt the message “Bill created successfully” on the screen.
Clear- Left clicking on this button will blank out all the fields.
Cancel- Left clicking on this button will neither validate nor insert the data you have entered. By left clicking on this button you will be taken back to the “Billing Detail” screen.
Browse- If you would like to select the Excel file from the File Dialog instead of typing in the “Spreadsheet” text box, click on the Browse button. Clicking on the Browse button, will open the File Dialog window. This window will have the title as “Choose file”. You can select the Excel file you want to upload from the specific location. Once you select the file, the file name will appear in the “File Name” select box. If you click on the “Open” button in the File Dialog, the File Dialog will get closed and the full path and the name of your file will appear in the “Spreadsheet” text box.
Search- Left clicking on this button will first validate the Search criterions provided by you. If the information provided is not valid, it will prompt the appropriate messages on the screen. If the information is valid then it will take you to the Search Results screen. If there are any results fetched on the basis of the search criterions provided, the results will be displayed in the tabular format. If there are no records retrieved, then the message: “Please perform the search with a different set of Search Criteria’s” will be displayed on the Search Results screen.
Save Preference- By left clicking on this button, your selected Billing Screen Preferences will be saved. Now you can view the selected Billing Screen with the desired columns in the desired column sequence and sort order.
Delete Preference-If you left click on this button, it will pop up the message “Do you want to delete the preference set for the selected screen?” If you left click on the OK button on the pop up your preference will be deleted. It will pop up the message on the screen, “Delete is successful.”
Add New Recipient- By left clicking on this button, the system navigates to the detail screen to set up a new contact. Please see Recipient Information for screen definition.
OK- By left clicking on this button, you will be returned to the previous screen (Export Preferences).